EM61-MK2A Odometer Calibration
The EM61-MK2A Odometer is essential
to taking readings in Wheel Mode.
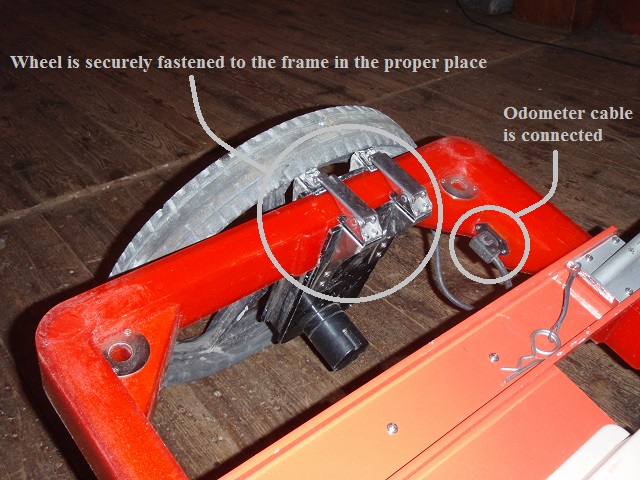
Before starting a survey that uses the odometer, make sure that the wheel with the odometer is securely connected to the cart frame against the alignment block and the odometer cable is plugged into its proper place.
Checking EM61-MK2A Odometer Wheel
Different terrains may have different odometer values known as wheel increments. For instance, a plowed farm field will have a different wheel increment than smooth asphalt over the same amount of distance. Therefore, it is important to perform an EM61-MK2A odometer calibration to accurately measure a survey line.
Wheel Increment Test:
On perfectly flat ground, Geonics suggests setting the Wheel Increment to 0.66 ft if using the Imperial Measurement System or .2m if using the Standard Measurement Setting. Often, the user may need to change this setting. To calculate the wheel increment, perform the Wheel Increment Test.
1. Measure and mark a fixed distance using a tape measure somewhere in the survey area. Record the fixed distance; call this number D. Calibration must be done at the site of the survey so that the terrain of the calibration is consistent with the terrain of the survey area. The fixed distance should be at least as long as the survey line. To ensure that the EM61 is pushed in a straight line, the user may wish to keep the tape measure on the ground and use it as a guide against the EM61 wheel.

EM61 Operational Procedures – Setting the Wheel Mode
2. In the Survey Setup Menu of the EM61-MK2A program on the data logger, set the Wheel Increment to 1 and Start Station to 0. Make sure that the EM61 Mode is Wheel.
3. Align the axle with the beginning of the line. Use this as guide for both the start and end of the line to ensure accuracy. In the Monitor/Log Menu of the EM61-MK2A program, begin recording data. Push the cart until the axle reaches the end of the line. Stop recording once the proper distance has been covered.
4. Record the Station Number. Call this number S. Divide the fixed distance (D) by the station number (S) to determine the proper EM61-MK2A odometer calibration.
D/S=Wheel Increment
5. Input the new wheel increment. To check that the new value is correct. Reset the Start Station. Align the cart axle against the test line and record data for the length of the line. The odometer should accurately measure the test line.
It may be beneficial to perform this test multiple times before ultimately setting your line increment.
For example:
Jeff determined his survey line was 50 feet so he decided to create a calibration line of a distance of 50 feet. He set his EM61 Mode to Wheel, Start Station to 0, and Wheel Increment to 1 in the Survey Setup Menu on his data logger. He then accurately recorded 50 feet with these settings in the Monitor/Log Menu.
His station number came out to 81.

Station Intervals
He proceeded to divide 50 by 81 because he knew D/S equals an accurate wheel increment.
50/81=.617
Jeff then changed his Wheel Increment to .617. To ensure this EM61-MK2A odometer calibration was correct, Jeff reset his Start Station and recorded along the line again to make sure the EM61 correctly measured his test line.