EM61-MK2A Survey Setup Menu on Archer
Configure the EM61-MK2A Survey Setup Menu on the Archer.
1. Using the stylus, select the EM61-MK2A Survey Setup menu.
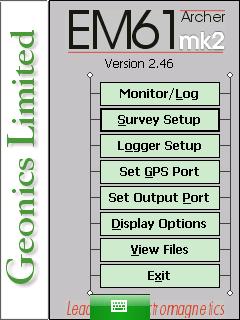
EM61-MK2A Program for Archer
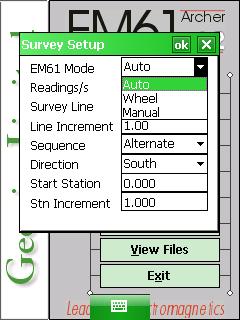
EM61 Survey Setup Mode Options: Auto, Wheel, or Manual
2. Choose an EM61 Mode.
There are three options: Auto, Wheel, and Manual. In Auto Mode, readings will be automatically recorded at a specified frequency. This is often used in conjunction with a GPS where readings and GPS coordinates are synced together at station intervals. In Wheel Mode, readings are triggered at intervals determined by the user and an odometer at the EM61’s wheel base. Please request an odometer wheel if you plan on using wheel mode as not all trailer kits possess an odometer. In the Manual Mode, readings are manually triggered by the user via button either on the data cable or EM61 electronics. This can be useful when performing a survey on a grid where lines and station numbers are used to keep track of data points.
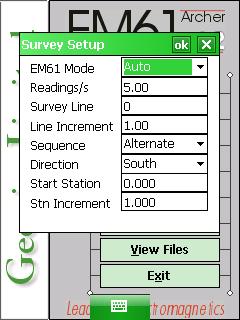
Select Readings and input how many per second.
If the user selects the Auto Mode, he must select the number of Reading /s. The Reading /s Field is the number of readings the EM61-MK2 will take per second on a scale of 1 to 16. The default is 5. This option is “Not Available” if the user selects a different mode. More readings per second may help filter out noise but often 1 or .5 may be useful since a user cannot walk that quickly and too much data can present challenges in post processing and are more likely to be corrupted.
3. Select a Survey Line to begin the survey.
The Survey Line is the numerical value given to each survey line. Generally, these are coordinates of a line in the survey grid. If the user names the Survey Line by a number, the EM61-MK2 program will automatically name each subsequent line a new number based on the Line Increment. The Line Increment is the distance in which Survey Lines will be from one another. For example, if the first Survey Line is named 2.50, for Y=2.5 on the survey grid, and the Line Increment is 2.50, the proceeding lines will be named 5.00, 7.50, 10.00, and so on. In this example, the Start Station and station positions shown during data acquisition would represent a X coordinate along the survey line.
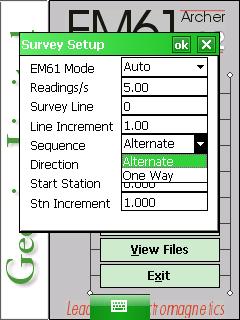
EM61-MK2/A Survey Setup Sequence
4. Choose the line Sequence.
The Sequence menu determines whether the user is going to conduct each survey line in the same direction (One Way) or changing directions for each line (Alternate). Data acquired on a grid is often acquired using the Alternate setting. If using wheel mode and the grid is fairly small, it might make sense to pick One Way to ensure the same starting location for each line.
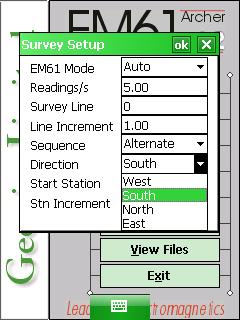
EM61-MK2 Survey Setup Direction Menu
5. Note the line Direction.
The user can note the line direction (North, West, South, East) that the EM61 cart will survey on the first line. If the Sequence is One Way, this setting will stay the same for each data line. If the Sequence is Alternate, the EM61-MK2 will automatically switch the directions for each line with the user’s approval. If in doubt and the survey is conducted using a grid, it often works out well for North to represent the direction towards greater positive Y values and East to represent the direction of increasing X values. In the end, the instrument does not know which way it is heading besides what you imput so this is purely for note-taking purposes.
6. Select a Start Station number and Station Increment.
For instance, if the operator is using the imperial measuring system and starting at X=5 feet away Y axis, the operator may want to put in a measurement of 5.00 or take good notes (or both).
If in the Auto Mode or Manual Mode, the user needs to select a Station Increment. In Auto Mode, the Station Increment field is, in essence, the “reading” increment and may be set to 1 to display the number of measurements acquired. In the Manual Mode it represents the distance between stations along a survey line. Once again, if the value is set to 1, the distance along a survey line represents the number of readings recorded. This value is also used with the Start Station Field to display information with graphics. If in the Wheel Mode, instead of a Station Increment, there will be a Wheel Increment. The Wheel Increment determines readings depending on how far the EM61 has traveled via odometer. The wheel increment is often approximately 20 cm; however, one needs to read the lesson on calibrating the measuring wheel to yield greater accuracy along a line.
7. After changing the EM61-MK2 Survey Setup Menu options, it is important to save.
Tap the OK Button to save. After tapping the OK Button, it is safe to click on the X Button to exit. If the user exits without using the OK Button, the changes will not be saved.